Sunday, February 9, 2014

A Valentines Day Classic: Conversation Heart Cookies

I'm a sucker for Valentine's Day- I just love it. I love the sweets, the silly cards and giving my boyfriend his annual Valentine's Day themed boxers from The Gap. The same year that I started giving my man the boxers, I also started making him these cookies- Conversation Heart Valentines Cookies. He loves sugar cookies, and although I have blogged about them quite a bit, they are the cookie that I actually make most infrequently. So, I make a point to make him these every year.


I love making these cookies, because I finally have them down to a science. I was never quite good at piping font, until I discovered this trick of making a template. Here, I have provided step by step instructions on making your template and piping. You'll be making impressive conversation heart cookies in no time!

Here are the directions on how to make your own Template and Stencils...

  1. Choose your heart cookie cutter and measure. Mine were 3 inches wide and 3 inches tall.
  2. Created a word document and form columns  as wide as your cookie cutter.
  3. Type the phrases that you want to pipe on your cookies. Enlarge the font and make sure the phrases are no longer the cookie cutter's measured length (use the ruler on the left side margin).
  4. Also, be sure to space out the phrases on the document; put at least one or two lines by hitting the return button on your key pad. 
  5. Print and measure against your cookie cutter- you may need to adjust things here or there to make the phrases fit within your cookie cutter.
Great, you've make your basic template- Here's whats next
  1. Now place your cookie cutter over each phrase and trace.
  2. Cut out each heart
  3. Your stencils are ready!


You're ready to pipe-- your cookies have cooled and you've piped your heart cookie in one sold color and let it set. The frosting needs to be almost completely set before working with your stencil.

  1. Place your stencil on top of the cookie and center it. 
  2. Using a tooth pick or push pin, trace the phrase by gently poking holes along the word or phrase. 
  3. Lift the stencil and you should see tiny dots that form your word or phrase.
  4. Pipe and trace the dots you created with the stencil and you will have stunning Conversation Heart Cookies!

Though this seems like alot of steps, its pretty simple and the results are gorgeous! I swear all your friends and lovers will be impressed! 


If you're feeling like experimenting, I love free-handing cursive and making these cookies look super fancy- give it a try!


Happy Valentine's Day!

Saturday, January 25, 2014

One Epic Chocolate Chip Cookie

One of my favorite things that happens around Christmas is my ladies night out with my sister, her BFF and sister-in-law. We all get together once or twice a year, if we're lucky, but its always a good time.

This years ladies night destination was the The Blue Dragon, Chef Ming Tsai's newest 'Asian Gastro Pub' in Boston. We split a selection of appetizers, noodle bowls and had some seriously delicious cocktails. But for me, the highlight of the evening was dessert (which, I can't deny, is usually the case!)

Chef Tsai was brave by putting just one dessert on the menu. If there is just one dessert option, it has to be seriously spectacular- and it was! Dessert was a Skillet Baked Chocolate Chip Cookie, topped with a heaping scoop of Vanilla Ice Cream and Caramel Sauce.


This Cookie was HUGE! Probably 6 to 8 inches in diameter and was perfect for sharing. It was baked fresh to order and came to our table perfectly warm and delicious. Cookies this large can be tricky to bake too.. they can end up being way to under cooked in the middle with edges to crispy, but this cookie was baked to perfection. Needless to say, we immediately dug into this bad boy.


Check out this heaping scoop of ice cream too... Usually I am not one that likes cold ice cream on hot cookies... I'm just not a huge fan of melted ice cream, but this might be my exception to the rule. The vanilla ice cream was super creamy and was simply perfectly paired on this cookie. The added bonus of the caramel sauce brought out the yummy brown sugar and molasses flavors of the cookie. This was a truly epic cookie- and Kristy approved.

The four of us ladies devoured this cookie in no time. Not only would I highly recommend this dessert, but I would highly recommend the Blue Dragon- just leave some room for the cookie!


Sunday, January 5, 2014

Savory Baking: Homemade Pizza How To

Its January... which for me means both my waistline and my wallet need a little bit of love! Its time for a sugar detox and find a few ways to save a few extra pennies here and there to recover from the crazy holiday season. So, come January, generally my cookie baking slows down but my savory baking tends to amp up a bit. If you are anything like me, a little sugar detox will not keep me from the kitchen!

So in my last hurrah before I  go full swing into no carb, no sugar, veggie mania on Monday, I decided to indulge in my cravings for pizza. But, I opted for homemade pizza- not only can I control the ingredients and calories (I know, should I really be addressing saving calories on a baking blog?!?!- Oh but I am!) but I can also save 20 plus dollars by making it myself.


Okay, so first thing first, you need an excellent pizza dough recipe. Most pizza dough recipes are super similar: a combo of Flour, Yeast, Salt, Sugar, Water and sometimes Olive Oil or other spices. I use this one by Bobby Flay- it's simple and yields pretty good results.

Next, follow the instructions, particularly when it comes to the yeast, exactly. So yeast is picky- its needs the perfect environment to thrive- it can't be too hot, or to cold and it needs food. The Bobby Flay recipe called for 110F temp water- The prefect temp for yeast to dissolve in is between 110-115F. If its too cold the yeast essentially won't dissolve or wake up, and if it's hotter than 115F you'll kill it- both yielding less then stellar dough. So get out your candy thermometer and take the temp of your water- it's one of those necessary steps that should not be overlooked.  Oh and remember that I said yeast needs food? Well that's the sugar- yeast loves sugar and helps it thrive so do not omit the sugar.

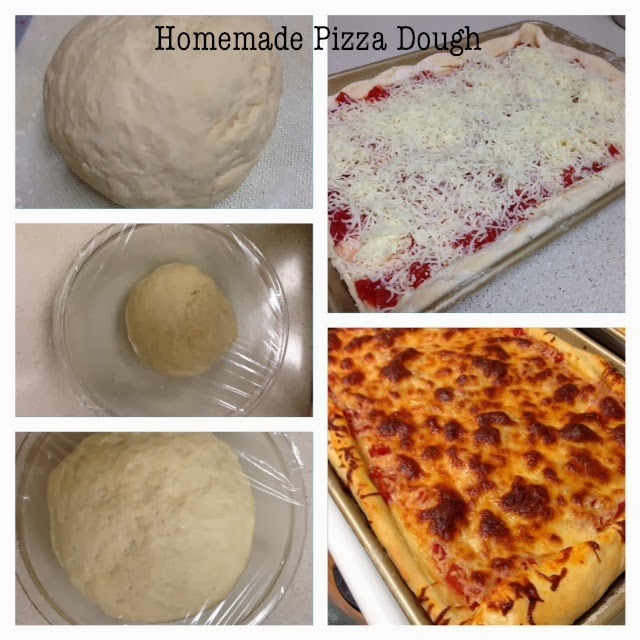
Now, onto combining the ingredients... There are a couple methods here that I use- depending on time and my mood.  If I am more rushed, I throw all the dry ingredients in my stand mixer equipped with a dough hook, and slowly add in the warm water until a dough ball forms- takes less than 3 minutes. If I have more time and patience, I dissolve the yeast in the warm water, then add the sugar to the yeast mixture and stir gently with a wooden spoon until dissolved. Then I mix in the flour and salt by hand until a dough ball forms. Done and done.

Alright, moving onto the rising... gently kneed your dough into a ball, place in a greased bowl and cover in plastic wrap. To help your dough along with the rising process, put it in a warm place- Here are a few options and tricks- pop next to heater vent, radiator or something warm! Something that I do at home since all my heat vents are near my ceiling is to turn my oven on to the lowest heat setting while I am making the dough. Once its heated, I turn the over off. When my dough is ready for rising, I pop the dough in the oven, but keep the oven door open. This keeps it from getting too warm, yet is a perfectly cozy place for your dough to rise. If you have a good trick for this, put it in the comments below!

So you've let your dough rise for an hour and its doubled in size.. Fantastic! Onto rolling out your pizza. I prefer to divide the dough in half and roll out two pizzas, so I literally cut my dough in half with a knife then I start rolling- One Tip- if you're making a round pizza, start with a rough ball of dough, if you're making a rectangle pizza as I did, start with a rectangle piece of dough. As you roll, this will help you end up with the shape you need- not some wacky ameba like shape!

Once you've rolled out the dough, throw some cornmeal on the pizza pan to prevent the dough from sticking and place the dough on top. Let the dough rest for 10 minutes before putting your toppings on.

The next part, I feel needs no direction- Assemble your pizza... everybody has a favorite flavor combo or a specific pizza toppings layering technique that's all your own--- go nuts, have fun, make it delicious!

Lastly- bake. I like to bake mine at 400F for 10 minutes then up the temp to 425F for the last 10 minutes. I love my cheese super crispy and the last 10 at 425F always seems to do the trick!

My last tip is to brush some olive oil on the crust after the pizza comes out of the oven. I was a server and bartender at a pizza place in college and this is how they always did it- and I thinks its delish!

Okay- I think that sufficiently covers how to make exceptional pizza at home... now turn on some football, crack open a beer and enjoy!

Monday, December 9, 2013

Best Ways to Frost Holiday Sugar Cookies

Consider this the sequel to my last post which discussed my favorite sugar cookie recipe. Now, we are on to the real fun part- Frosting the Sugar Cookies!


My favorite way to frost Sugar Cookies is with Royal Icing- Royal Icing is a frosting made up of Confectionery Sugar, Meringue Powder with Water and this icing dries super hard thanks to the Meringue Power. Simply mix these 3 ingredients in a stand mixer until you achieve a smooth glue like texture and you having Royal Icing. There are many great recipes available on the Internet, but I always start with this Martha Stewart Recipe (yes, If you haven't guessed it yet, I am a huge fan of Martha Stewart's recipes.)

Now, there is a reason I said that I "start" with using the Martha Stewart Recipe for Royal Icing. When I am making icing for my base or first layer of icing, I prefer it a bit thinner than what M.S. suggests, and I add a bit extra water. This helps create a super smooth base of icing and makes it easier to pipe. I always start with the same method as well... Create a damn by outlining the cookie with icing piped through a piping bag, then fill in the center of the cookie. I let this dry for at least a couple hours before I add any details on top of the cookie.


When I am prepping icing for doing smaller details, I stick to pretty closely to Martha's Recipe. When the icing is a little bit thicker- you have greater control over the smaller details. And, I always use the smallest round piping tip I have on hand... this yields great results.


Here are a few other tips and things I keep in mind when I am frosting Cookies....

-I always keep the frosting not in using in the fridge covered with a damp cloth- The icing will tend to dry up quickly, and this helps keep it as moist as possible.

-Always burp your piping bag after you refill... Not sure what I mean?... When you refill your piping bag with frosting, twist off the top and squeeze all the frosting down to the tip until you hear an air bubble pop and see the splatter of icing come through the tip--- better that this happen in the icing bowl than on your cookie!

-Gel-Paste food coloring I find lends for the most vibrant and bright colors. No need to mix colors according to ratio on a box. Though- one work of caution... keep in mind that when you are adding food coloring to Royal Icing you are adding a liquid- this will thin out your icing a bit. Keep a little extra powder sugar on hand in case things get too thin...

-Need black icing? Start with Chocolate! Simply add cocoa powder to the base dry ingredients of your icing, then add the black gel-paste coloring. This will help prevent your frosting from getting too thin, yet will get you a nice rich dark black.

-It's better to refill your piping bag frequently, then load it up with lots of icing... the heat from your hand will thin your icing and may make it too runny... so frequent refills will prevent this from happening.

-Looking to work with Sprinkles? Think back to your elementary school crafting days with sparkles! Pipe on your icing, sprinkle with sprinkles, then shake the excess sprinkles off onto wax paper- super fun and super easy!

-Lastly- set aside an afternoon, turn up your Christmas carols-  experiment a bit and have fun with this! I love piping decorating Sugar Cookie- there's so much creativity involved and is a great way to get in the holiday spirit!

Thanks for reading and happy decorating!

Wednesday, December 4, 2013

It's Christmas Cookie Season!

Christmas is one of my favorite times of year, primarily because Christmas and Cookies go hand in hand. (Can you really have one without the other?! I think not!)


One of my favorite and most classic cookies to make this time of year are sugar cookies. The Ornament Sugar Cookie above was one I made last year for my sister's holiday party and were given out as party favors. You simply can't go wrong serving them for dessert, giving to friends, family or neighbors, or enjoying one with an afternoon latte (my favorite kind of 3pm break!).

I have two go-to sugar cookie recipes that I have shared below. I like each recipe for different reasons and use each for different purposes.

The first is a classic Martha Stewart Sugar Cookie Recipe with Royal Icing. I first found this recipe in the December 2009 Issue of Martha Stewart Living. I still have the magazine, and have made this recipe so many times that the pages are stuck together with sugar (Thank goodness I have it memorized)! But, here's what I like about it- It's simple, straightforward, and yields a perfectly sweet and sturdy sugar cookie. Though I personally prefer the texture of a super soft sugar cookie, these cookies are not overly crunchy or crumbly, but hold up exceptionally well for traveling or even shipping. For the Ornament cookie above, I used this recipe and royal icing recipe- and out of the 40 cookies I shipped from Los Angeles to Boston to my sister, only 2 broke or cracked. So if you plan on shipping cookies this year- this is an excellent recipe choice.

My second favorite sugar cookie recipe was a great online find: Mama's Soft Sugar Cookie. As I mentioned before, I prefer cookies, particularly sugar cookies, to be soft to the bite, yet cooked through. This sugar cookie recipe incorporates sour cream into the dough and these cookie rise and puff up quite a bit while baking. I love how moist, soft and sweet these cookies are. I prefer this recipe for when I am serving cookies in my house, or if I know I do not have to travel far with them. Though they will last about a week in an air tight container (same as the Martha Stewart Recipe above) they are a bit more delicate and will break a bit easier. I also top and decorate these cookies with Martha Stewart's Royal Icing.

I hope you find these two recipes helpful during this holiday cookie season and do Stay tuned! My next post will be on tips and tricks for decorating these Christmas favorites!

Thursday, November 21, 2013

3 Simple and Essential Cookie Baking Tips

These bad boys just came out of the oven... Chocolate Mint Chocolate Chip- Look delish?!?


With holiday baking season in full swing, I though I would share 3 cookie baking tips that I swear by.

First, I always use room temperature ingredients. I know, I know, this requires thinking ahead, but it is so worth it. Using ingredients like eggs, butter or other dairy products straight out of the fridge will cause lumpiness, and your batter or dough won't bind properly- no bueno! If you are taking the time to bake from scratch, set yourself up for success with this first crucial step. Take your butter and eggs out of the fridge 30 minutes to an hour before hand. You'll thank yourself later! Also, if you are looking for a more detailed explanation on this step, check out this Real Simple Article and Video.

Second tip, after you roll out your drop cookies, or cut your dough with a cookie cutter, pop the cookie sheet with the dough on it in the freezer for 5-10 minutes. This prevents the butter from frying the bottom on your cookies and also helps bind the cookies. I have even found I sometimes get a plumper cookie with this step. Plump cookies make me very happy!

Lastly, I always use parchment paper (or you could use a Silpat). This not only makes clean up a cinch, but also helps cook the bottom of your cookies evenly, and prevents sticking. I've been know for baking all night long (literally, till 3 or 4 in the morning!)- so anything that makes clean up easier is necessary in my book!

Do you have a cookie baking tip that you swear by? Or do you completely disagree with my tips? I would love to hear it! Post it in the comments below!

Thanks for reading- and Happy Cookie Baking!

Sunday, November 17, 2013

Welcome to 'My Cookie Soap Box"

Welcome to my blog, "My Cookie Soap Box."

How this all began is an important story. I consider myself to be a sweets connoisseur, most specifically a cookie expert. I eat, sleep and dream cookies, having been baking and enjoying them since I was a child. I love developing my own recipes, and making the challenging sacrifice of tasting most any cookie (and sweet) that I can get my hands on. Though the other side of it is this... Nothing grinds my gears more than spending my money and calories on a sweet treat that doesn't live up to basic standards.  I am known to get on my proverbial "Soap Box" and call out exactly what went wrong. I simply have high expectations and think sugar and sweets should be held to the same standard we expect of any dining experience. To lay it out for you, here's what I believe...


I believe in indulgence.

I believe my indulgence should be worth every calorie and penny.

I believe in butter, sugar, flour and eggs.

I believe sweets should be made with only the best ingredients.

I believe in desserts made from scratch.

Therefore, the purpose of my blog is this... I hope to educate and inspire you to expect more from your desserts, whether it be cookies, cake, pies, tarts or whatever your favorite indulgence is. Though I promise to be kind, I also promise not to hold back!

Thank you for reading and I hope you enjoy what I have to say!