Its January... which for me means both my waistline and my wallet need a little bit of love! Its time for a sugar detox and find a few ways to save a few extra pennies here and there to recover from the crazy holiday season. So, come January, generally my cookie baking slows down but my savory baking tends to amp up a bit. If you are anything like me, a little sugar detox will not keep me from the kitchen!
So in my last hurrah before I go full swing into no carb, no sugar, veggie mania on Monday, I decided to indulge in my cravings for pizza. But, I opted for homemade pizza- not only can I control the ingredients and calories (I know, should I really be addressing saving calories on a baking blog?!?!- Oh but I am!) but I can also save 20 plus dollars by making it myself.
Okay, so first thing first, you need an excellent pizza dough recipe. Most pizza dough recipes are super similar: a combo of Flour, Yeast, Salt, Sugar, Water and sometimes Olive Oil or other spices.
I use this one by Bobby Flay- it's simple and yields pretty good results.
Next, follow the instructions, particularly when it comes to the yeast, exactly. So yeast is picky- its needs the perfect environment to thrive- it can't be too hot, or to cold and it needs food. The Bobby Flay recipe called for 110F temp water- The prefect temp for yeast to dissolve in is between 110-115F. If its too cold the yeast essentially won't dissolve or wake up, and if it's hotter than 115F you'll kill it- both yielding less then stellar dough. So get out your candy thermometer and take the temp of your water- it's one of those necessary steps that should not be overlooked. Oh and remember that I said yeast needs food? Well that's the sugar- yeast loves sugar and helps it thrive so do not omit the sugar.
Now, onto combining the ingredients... There are a couple methods here that I use- depending on time and my mood. If I am more rushed, I throw all the dry ingredients in my stand mixer equipped with a dough hook, and slowly add in the warm water until a dough ball forms- takes less than 3 minutes. If I have more time and patience, I dissolve the yeast in the warm water, then add the sugar to the yeast mixture and stir gently with a wooden spoon until dissolved. Then I mix in the flour and salt by hand until a dough ball forms. Done and done.
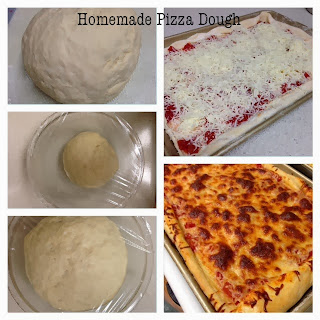
Alright, moving onto the rising... gently kneed your dough into a ball, place in a greased bowl and cover in plastic wrap. To help your dough along with the rising process, put it in a warm place- Here are a few options and tricks- pop next to heater vent, radiator or something warm! Something that I do at home since all my heat vents are near my ceiling is to turn my oven on to the lowest heat setting while I am making the dough. Once its heated, I turn the over off. When my dough is ready for rising, I pop the dough in the oven, but keep the oven door open. This keeps it from getting too warm, yet is a perfectly cozy place for your dough to rise. If you have a good trick for this, put it in the comments below!
So you've let your dough rise for an hour and its doubled in size.. Fantastic! Onto rolling out your pizza. I prefer to divide the dough in half and roll out two pizzas, so I literally cut my dough in half with a knife then I start rolling- One Tip- if you're making a round pizza, start with a rough ball of dough, if you're making a rectangle pizza as I did, start with a rectangle piece of dough. As you roll, this will help you end up with the shape you need- not some wacky ameba like shape!
Once you've rolled out the dough, throw some cornmeal on the pizza pan to prevent the dough from sticking and place the dough on top. Let the dough rest for 10 minutes before putting your toppings on.
The next part, I feel needs no direction- Assemble your pizza... everybody has a favorite flavor combo or a specific pizza toppings layering technique that's all your own--- go nuts, have fun, make it delicious!
Lastly- bake. I like to bake mine at 400F for 10 minutes then up the temp to 425F for the last 10 minutes. I love my cheese super crispy and the last 10 at 425F always seems to do the trick!
My last tip is to brush some olive oil on the crust after the pizza comes out of the oven. I was a server and bartender at a pizza place in college and this is how they always did it- and I thinks its delish!
Okay- I think that sufficiently covers how to make exceptional pizza at home... now turn on some football, crack open a beer and enjoy!


